2.Windows GPS Support
- Registering your GPS Maps [ PC ]
- Installing Maps for Garmin Basecamp [ PC ]
- Updating Maps on Windows
- Troubleshooting GPS Maps
- Installing Backroad Maps Digital
Registering your GPS Maps [ PC ]
Registering your GPS maps MicroSD


Technical guide – Backroad Map Books
1. Why Register Your MicroSD?
| Feature | Description |
|---|---|
| Computer‑based map downloads | Access to the latest Computer Maps for macOS & Windows. |
| Secure license storage | Keeps your gmapsupp.unl and gmapsupp.gma files safe in your account. |
| Discounted updates | Receive future map releases at a reduced price. |
| Priority technical support | Faster response for any Garmin‑map‑related issue. |
Free Updates – After registration you can download map updates for 60 days at no charge.
If you bought an older version from a retailer, you may upgrade to the latest map release within that 60‑day window.
Important:
• A card that has already been registered cannot be registered again.
• If your card is “used” or already updated, the registration will fail.
2. Prerequisites
| Step | Action | Notes |
|---|---|---|
| 1 | Insert the MicroSD card | • If your computer has an SD‑card slot, insert the card directly. • If not, plug the card into your Garmin GPS and connect the GPS to your computer via USB. |
| 2 | Log in to Backroad Map Books | URL: https://backroadmapbooks.com/account/login Create an account if you do not already have one. |
| 3 | Locate the license files | The required files (gmapsupp.unl and gmapsupp.gma) are in the Garmin folder on your MicroSD. |
3. Registration Workflow
All steps are performed on the My GPS Maps registration page.
3.1 Navigate to the Registration Page
-
After login, click the “MY GPS MAPS” button (top‑right).
-
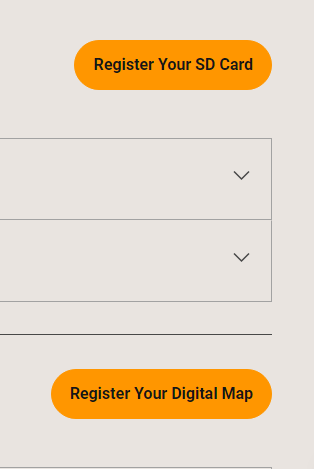
On the resulting page, select “Register SD”.

3.2 Upload the Unlock Code & GMA File
| Field | File | How to select |
|---|---|---|
Unlock Code (gmapsupp.unl) |
gmapsupp.unl |
Use the Choose File button to pick this file from the Garmin folder. |
Gma File (gmapsupp.gma) |
gmapsupp.gma |
Use the Choose File button for the second field. |
Tip:
Double‑check that the files you pick are exactly the.unland.gmafiles from the Garmin folder. Any mismatch will trigger an error.
3.3 Submit
-
Once both files appear in the form, click SUBMIT.
-
A green confirmation box will appear, and your product will be listed under “My Products”.

Result: The MicroSD card is now registered to your Backroad Map Books account.
4. Post‑Registration
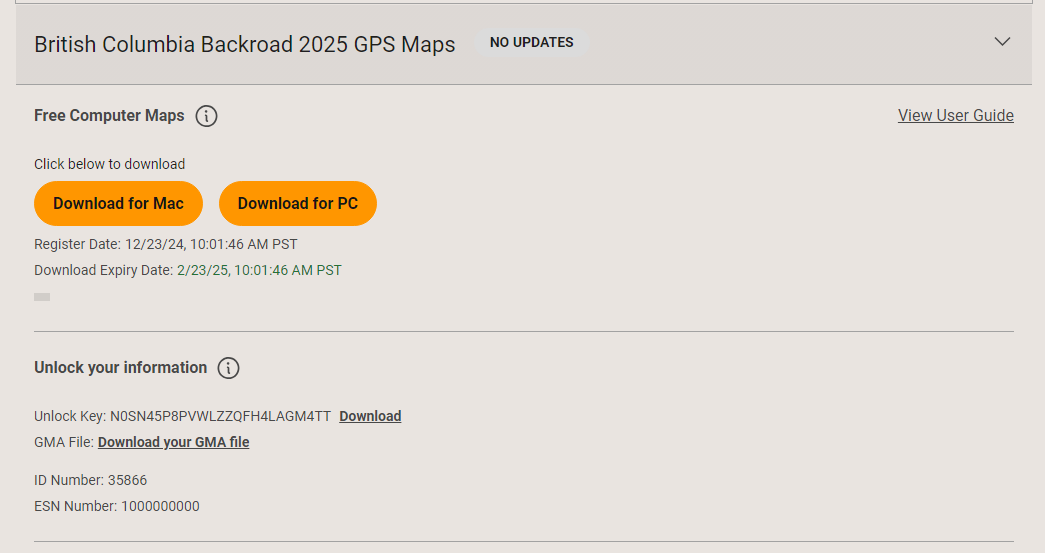
- Access the “Computer Maps” – Log in, go to “My Products” and download the latest PC‑compatible maps.
- Update within 60 days – Download updates for free.
- Backup your files – Although the unlock codes are stored in the cloud, keep local copies of the
.unland.gmafiles on your computer for future reference.
4. Common Error Messages & Fixes
| Error | Cause | Remedy |
|---|---|---|
| “No ESN data found with unlockCode” | ESN (Electronic Serial Number) missing or corrupted. | Contact Backroad Map Books support (email: gps<at>backroadmapbooks.com). |
| “Invalid File Uploaded” | Wrong file type chosen (e.g., a .zip instead of .gma or .unl). |
Re‑select the exact .gma and .unl files from the Garmin folder. |
| “This card has already been registered” | Card was previously registered on another account or already updated. | Not recoverable – you must purchase a new card or contact support for advice. |
5. Quick Reference
| Action | Shortcut |
|---|---|
| Log in | Ctrl+L (Chrome) |
| Open registration | MY GPS MAPS → Register SD |
| File picker | gmapsupp.unl → Choose File; gmapsupp.gma → Choose File |
| Submit | SUBMIT button |
Prepared by the Backroad Map Books Technical Support Team
Registering your GPS Maps Digital
1. Overview
This guide explains how to register your digital map access code so you can:
- Download computer‑compatible maps for macOS or Windows.
- Store a secure copy of your Garmin license/unlock files.
- Receive future updates at a discounted price.
- Access priority technical support.
NOTE: After registration, you receive free map updates for 60 days.
Older versions purchased from a retailer can be upgraded to the latest maps within that 60‑day window.
2. Registration Benefits
| Benefit | Description |
|---|---|
| Computer‑based map downloads | Get the latest map files for macOS and Windows. |
| Secure license storage | Your Garmin license/unlock files are safely stored in the cloud. |
| Discounted future updates | Pay less for subsequent map releases. |
Free Updates:
You can download map updates free of charge for 60 days after the first registration of the MicroSD card.
3. Update & Upgrade Policy
| Item | Policy |
|---|---|
| First‑time registration | 60‑day free update period begins on the day you click Submit. |
| Subsequent upgrades | If you purchased a previous map edition from a retailer, you may upgrade to the newest edition within 60 days of the first registration. |
| After 60 days | Updates become paid and must be purchased through the Backroad Map Books website. |
4. Important Warnings
⚠️ Unit ID & Access Code
The 10‑digit UnitID is required for digital‑map registration. It can be found under Settings → About on your GPS device.
3. Prerequisites
| Item | Requirement | How to Obtain |
|---|---|---|
|
MicroSD Card (Optional) |
If you choose to use a microSD card (not the physical memory). | Insert into a GPS or computer with an SD reader. |
| ACCESS CODE | A unique alphanumeric code printed on the MicroSD packaging. | Look for the “ACCESS CODE” sticker on the card’s label. |
| UnitID | A 10‑digit number that identifies your Garmin GPS. | Open the GPS → Settings → About (or Device Info) to view the UnitID. |
| Internet Connection | Required to submit the registration form and download computer maps. | Any reliable broadband or Wi‑Fi connection. |
4. Step‑by‑Step Registration
The following steps assume you have already plugged in your GPS so it is available and ready.
4.1 Log In to the Backroad Map Books Portal
- Open a web browser and navigate to
https://backrockodmapbooks.com - Click Sign In (top‑right) and enter your account credentials.


4.2 Navigate to the Digital Map Registration Page
- Once logged in, click My Account → Digital Maps → Register Your Digital Map.
4.3 Enter the Registration Data
| Field | Input | Example |
|---|---|---|
| Access Code | The code printed on the MicroSD card label. | BCBC-7r3325caa-8cec-483d-97db-059d88f78f29 |
| UnitID | 10‑digit GPS unit identifier. | 1234567890 |
The UnitID can be found under Settings → About on your GPS.
Access Code:  BCBC-7r3325caa-8cec-483d-97db-059d88f78f29
UnitID:       1234567890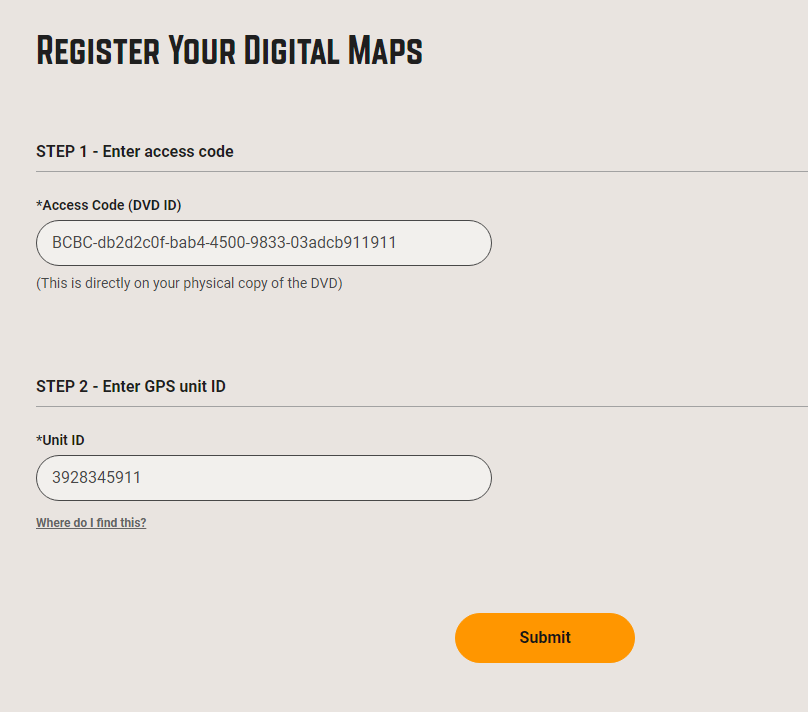
4.4 Submit the Form
- Review the values you entered.
- Click SUBMIT.
- If registration succeeds, a green success message will appear and the new product will be listed under your account.

5. After Registration
- Your digital maps are now registered and available for download.
- The new product appears in the My Gps Maps section of your account.
- You can immediately start downloading the computer‑ready map files.
6. Post‑Registration Tasks
-
Download the computer‑map files:
- From your account, click Download next to the registered product.
- Choose macOS or Windows as required.
- Follow the on‑screen prompts to install.
-
Backup your license files:
- You can also download a copy of your Garmin license/unlock files from the portal for local backup.
-
Schedule future updates:
- Within the 60‑day free window, simply click Get Updates in the portal.
7. Troubleshooting
| Symptom | Likely Cause | Fix |
|---|---|---|
| Registration fails with “Invalid Access Code” | Wrong Access Code or UnitID entered | Re‑check the GPS UnitID. |
| Registration fails with “UnitID already registered” | The same UnitID was registered previously | Contact support; you may have a duplicate product or need to unlink the old registration. |
| Unable to download updates after 60 days | The free update window has expired | Purchase the latest map edition through the portal. |
| Green success box never appears | Browser security block (e.g., pop‑up blocker) | Disable pop‑up blockers or try a different browser. |
8. FAQ
Q1. Can I use the Digital maps on multiple GPS devices?
A1. No – the registration is tied to your GPS UnitID, You can only load the maps on the registered GPS.
Q2. Do I need to install the Digital maps to a MicroSD card ?
A2. No, the Digital maps allow you to install the maps on the internal memory or your own microSD card.
9. Contact & Support
| Channel | Availability | Notes |
|---|---|---|
| Mon‑Fri 9:00‑17:00 PST | gps<at>backroadmapbooks.com | |
| Phone | Mon‑Fri 9:00‑17:00 PST | (877)-520-5670 |
For urgent issues, reference the UnitID and Access Code in your support request.
Installing Maps for Garmin Basecamp [ PC ]
Basecamp Map Installation [ PC ]
Installing and Using Backroad MapBooks on a PC
1. Prerequisites
| Item | What to do | Links |
|---|---|---|
| Garmin Basecamp | Install Basecamp to view and load maps. | Download Garmin Basecamp |
| 7‑Zip (optional) | If your OS can’t extract ZIP files, install 7‑Zip for free. | Download 7‑Zip |
| Backroad MapBooks account | Sign‑up or log in to access your map downloads. | Backroad MapBooks Login |
| MicroSD card | Insert into the PC or GPS unit to access the unlock key (.gma file). |
— |
Note – All map files are delivered as a single
.ziparchive (e.g.SECURED_BC2025_BRMB_BC2025‑Win.zip).
2. Downloading the Map Archive
-
Log in
- Navigate to the Backroad MapBooks website and sign in.
- If you don’t have an account, click Create New Account and follow the prompts.
-
Navigate to “MY GPS Maps”
- Click the MY GPS Maps button on the homepage to reach the registration page.
-
Locate your product
- Find the product title for your province (e.g., “BC2025”) and click the small arrow to the right of it to expand the product details.

- Find the product title for your province (e.g., “BC2025”) and click the small arrow to the right of it to expand the product details.
-
Download the ZIP
- Click the Download for PC button and choose a location to save the file (the default is usually the Downloads folder).
- The download link will point to something like:
SECURED_BC2025_BRMB_BC2025‑Win.zip.
3. Extracting the ZIP Archive
-
Locate the file
- Open the folder where you saved the archive.
-
Extract
- Windows – Right‑click → Extract All…
- If you’re using 7‑Zip, right‑click → 7‑Zip → Extract Here.
-
Verify extraction
-
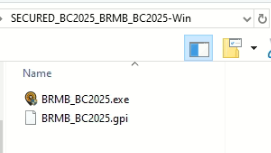
After extraction you should see a folder named similar to
SECURED_BC2025_BRMB_BC2025‑Wincontaining an installer executable and a copy of the .gpi file:
BRMBBC2025_2025.exe(replaceBCwith your province code).BC2025.gpi(replaceBCwith your province code).
-
4. Installing and Unlocking maps in Basecamp.
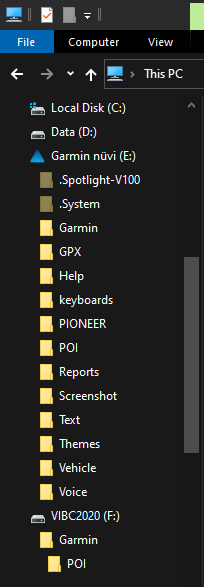
- Insert the MicroSD card
- If you have the MicroSD card inserted into the PC or your Garmin GPS and plugged into the computer.
- The card will appear as a removable drive (e.g.,
E:).
1b. Download your .gma
- If you Downloaded the .gma file from your account.
- The file will be downloaded to "Downloads" or the location you choose.
- Launch the installer
- Double‑click the executable (
BRMB####_2025.exe, where####is your province code). - A screen will appear guiding you through the installation, you can accept the default installation directory.
- A final screen will appear prompting you to provide a
.gmafile.
- Double‑click the executable (

-
Select the
.gmafile- Option A – SD File Select
- Pick your MicroSD drive from the drop‑down list.
- The installer will copy the unlock key to Basecamp automatically.
- Option B – Browse for file
- If the card isn’t shown as a drive letter, click Browse and navigate to the card or to the location where the
.gmafile was downloaded from your account.
- If the card isn’t shown as a drive letter, click Browse and navigate to the card or to the location where the
- Option A – SD File Select
-
Complete the installation
- Click Next → Finish.
- Basecamp will now contain the new map data.
5. Post‑Installation
- Launch Garmin Basecamp – Verify that the new maps are visible.
- Configure Basecamp – Use the following resource for detailed configuration options:
https://brmb.support/books/4configuring-garmin-basecamp
6. Frequently Asked Questions
| Question | Answer |
|---|---|
| What if I can’t find my MicroSD as a drive? | Use the Browse for file option on the unlock screen to navigate to the card manually. |
| Can I use the map on a mobile device? | This guide is for PC only. For mobile devices see the BRMBMaps App. |
7. Contact & Further Assistance
Need More Help?
- Phone – 1-877-520-5670
- Submit Support Request – > https://backroadmapshelp.zendesk.com/hc/en-us/requests/new
We’re here to help you get your maps up and running as quickly as possible!
Unlocking Maps in Garmin Basecamp [PC]
If you skipped the
.gmafile during the initial map installation, you can manually import it to activate the maps.
1. Download the .GMA Unlock Key
| Source | Where to Find It |
|---|---|
| From a device | Insert your microSD card → open the Garmin folder on the card → locate the .gma file (e.g., gmapsupp.gma). |
| From your account | Log in to your Backroad MapBooks portal → download the .gma file you received during purchase. |

2. Launch Basecamp
- Start Garmin Basecamp.
- If Basecamp detects any locked maps, a dialog will appear automatically.
- Click Unlock maps to begin the process.
- Screenshot:

If the dialog does not appear:
Open the Map Manager manually:
Maps→Manage Map Productsin the menu.

3. Import the .gma File
-
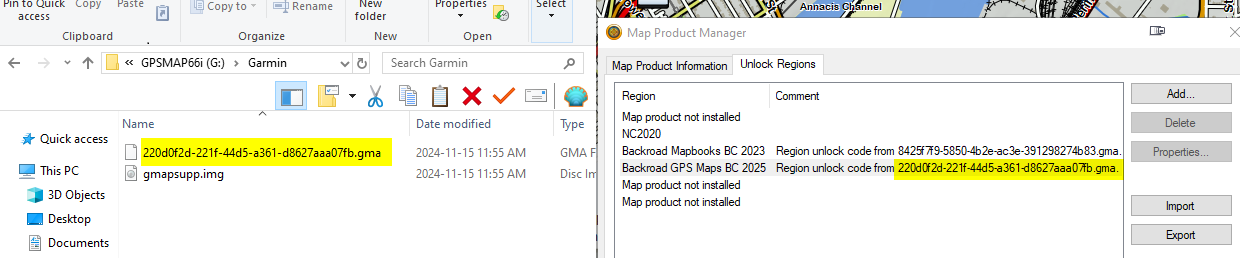
In the Map Product Manager window, click the Unlock Regions tab (top‑left).

-
Click Import.
- A file‑open dialog appears.
- At the bottom right, change the filter from
.ucxto.gma.

-
Navigate to the
.gmafile:- If you keep the key on your microSD card, browse to
E:\Garmin\(or whichever drive letter your card is assigned). - If you downloaded the key, go to the folder where you saved it.

- If you keep the key on your microSD card, browse to
-
Select the file and click Open.
-
Verify success – the map entry should now show something like “Region unlock code from …” next to its name.

4. Refresh Basecamp
- Restart Garmin Basecamp.
- From the Maps menu, choose Backroadmapbooks to load the newly unlocked maps.
5. Need More Help?
- Phone – 1-877-520-5670
- Submit Support Request – > https://backroadmapshelp.zendesk.com/hc/en-us/requests/new
We’re here to help you get your maps up and running as quickly as possible!
Updating Maps on Windows
Prerequisite: Your GPS Maps must be registered in the BackroadMaps account.
Important: Free update links are available only 60 days after registration.
Not registered yet? Create an account here.
1. Log in to Your BackroadMaps Account
-
Open a browser and go to BackroadMaps.
-
Log in or create a new account.
-
Click MY GPS Maps to reach the registration page.

2. Download the PC Updater
-
Expand the product details by clicking the down‑arrow.

-
Under Map Updates Available for Download, click PC Updates.

-
Once the download completes, open the downloaded file BRMB_updater2025.exe (located where you saved it).

-
When prompted, click Yes to allow changes.

-
Follow the welcome wizard:
- Click Next.
- Accept the license agreement.


3. (Optional) Create a Backup
Tip: Backups protect your data in case the update fails.
A folder namedBackup_BRMBwill appear on the Desktop and contain a copy of your current map data.
-
On the backup screen, choose your microSD card from the Drive drop‑down.
-
Click Backup.


-
Wait patiently while the data is copied. Verify the files exist in the backup folder before proceeding.
⚠️ Backup errors?
* The updater may take a while to copy large map files. * Do **not** interrupt the process.
4. Update the Maps
-
Select your microSD card again from the Drive drop‑down.
-
Copy the new 25‑digit unlock key displayed in the Unlock Information section.

-
Paste the key into the Unlock Key field.
-
Click Update.


5. Verify the Update
-
Insert the microSD card into the GPS or connect the GPS via USB so the card appears as a drive.
Need help connecting your GPS? Read our guide. -
After the update finishes, load the maps on your GPS.
-
Verify the map data by navigating on the device to SETUP > MAP.
6. Troubleshooting
If the update fails or maps don’t appear correctly:
Check the detailed Troubleshooting Steps for Windows GPS Maps.
7. Need More Help?
- Phone – 1-877-520-5670
- Submit Support Request – > https://backroadmapshelp.zendesk.com/hc/en-us/requests/new
We’re here to help you get your maps up and running as quickly as possible!
Quick Reference
| Step | Action |
|---|---|
| 1 | Log in → MY GPS Maps |
| 2 | Download PC Updater |
| 3 | Backup (optional) |
| 4 | Copy unlock key |
| 5 | Run updater (BRMB_updater2025.exe) |
| 6 | Accept license, backup, then update |
| 7 | Verify maps on GPS |
Troubleshooting GPS Maps
Troubleshooting Maps on your GPS
Check our Compatibility List to see if your unit is supported Compatibility List
Connecting your GPS to computer
When connecting your GPS to the computer you will need to use a USB cable.
When you plug your GPS into the computer it will put it into MASS STORAGE MODE allowing you to see the contents of the Device and the SD card inserted.
If your GPS unit is displaying an icon on the screen it usually indicates that it is connected correctly.
After a minute or so you will hear a ding or see a new drive letter show up under "This PC"

The GPS unit is not showing up when you plug it into the computer.
Some legacy Garmin outdoor handheld devices can be put into USB mass storage mode, turning the device into a card reader and allowing an inserted microSD card to be read by a computer. This card reader provides the ability to install detailed mapping to the device, in addition it provides the ability to locate active tracks that have been archived to the card. While in mass storage mode, these files can be viewed on the computer. However, there is no access to any data stored on the device itself while in this mode.
The following devices can be placed into mass storage mode:
- • Astro 220*
- • eTrex Legend Cx
- • eTrex Legend HCx
- • eTrex Venture Cx
- • eTrex Vista Cx
- • eTrex Vista HCx
- • GPSMAP 60Cx
- • GPSMAP 60CSx
- • GPSMAP 76Cx
- • GPSMAP 76CSx
- • Rino 520HCx
- • Rino 530HCx
To put these devices into mass storage mode, follow the instructions below:
- 1. Connect the device to the computer using the USB cable
- 2. Go to the Main Menu
- 3. Select Setup
- 4. Select Interface
- 5. Select USB Mass Storage Mode
Your device will now create a drive on your computer so you can access the data on your microSD card.
Maps do not show on GPS:
If the maps are not loading on the GPS and you are not getting an error message you can check the following.
- Re seat the card in the GPS
- Go to SETUP > MAP > Configure Maps/My Maps/Select Map
Different Units will have different option in the Map settings menu as shown above.
- Look for Backroadmapbooks in the map list and ensure it is set to enabled.
Adjust Map detail to the highest value under the same MAP settings
- Go to SETUP > MAP > Advanced Map Setup > Detail Level
Detail Level should be set to MOST for best results with our maps.
View the map on your GPS and zoom and pan to a new area and let the map render the detail for you.
Maps did not show in map list?
If your maps do NOT show up in the map list on your GPS you can try inserting it into the computer to view the contents of the card and verify the card is readable. The microSD card should contain a GARMIN folder with the following files and folder inside:
- POI [Folder] - contains the .gpi file that loads the points of interest write up information
- gmapsupp.img - Map data needed to view the map
- gmapsupp.unl - unlock key license to unlock the maps
- gmapsupp.gma - gma authentication license to authenticate the maps
Updated microSD cards will have a new 25 digit .gma file. example: 6UC7C710BP9KL7TMCX8S4J88.gma
Overwritten SD Card:
Did you send anything to your unit? We recommend NOT sending any type of additional MAP DATA to the card. if you tried to send other maps to our card you may have overwritten the SD Card with alternate map data or licenses.
Garmin Maps & License files use the same name gmapsupp.* so when sending additional map data to the card it may overwrite our maps with the new map set your sending.
If you have overwritten your card you can try and rebuild it if you registered it in your account.
Defective Adapter:
If your Unit requires the bigger card and if you have a faulty adapter, the SD Card won't be read by the unit. Try a different Adapter if one is handy. Otherwise purchase a new one at any Superstore, Walmart, Futureshop, Best Buy.
Installing Backroad Maps Digital
Backroad Maps DIGITAL Maps are installed directly to your GPS unit memory, your own SD card or your Garmin Smart Watch
Building and installing your maps can be done using Garmin Basecamp and Mapinstall.
Connect your GPS to your computer
To Install your Backroad Maps Digital version you need Garmin Basecamp installed on your system and your Backroad GPS maps title installed and unlocked.
Install and unlock Maps in Basecamp
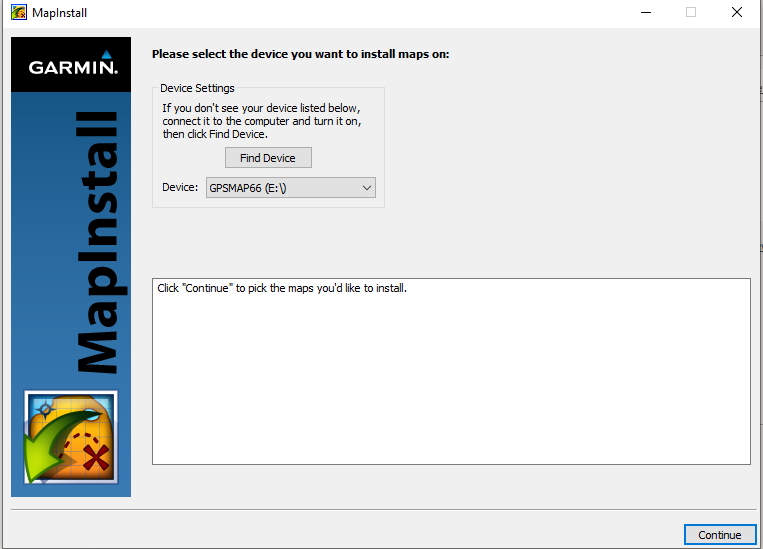
1.)Launch Garmin Mapinstall.
2.)Click Find Device or Select it from the drop down menu. Click continue.
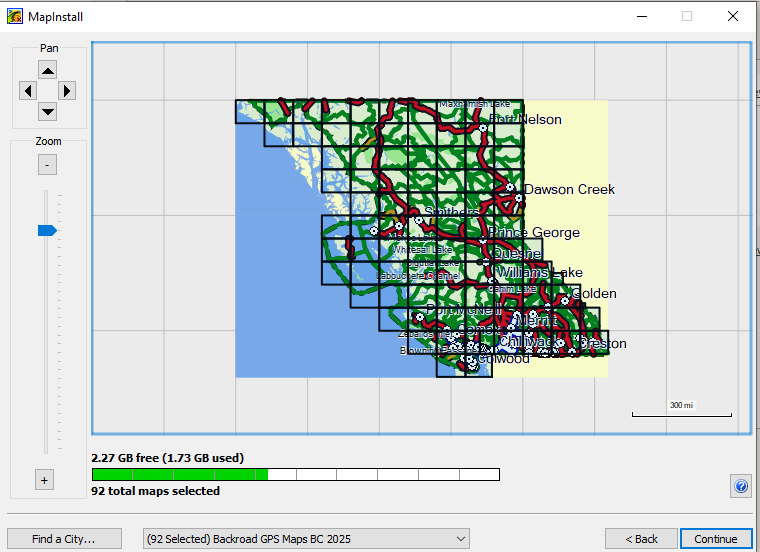
3.)Use the Left mouse button to select the grid sections of the map you want to Build.
Use the right mouse button to de select the grids
Click Continue
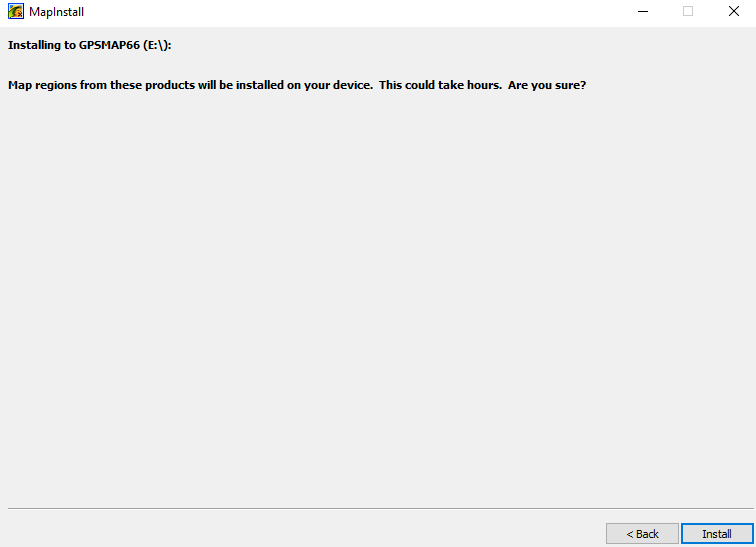
4.)You will be shown the installation location and asked to confirm the installation.
Click Install to start installing the maps.
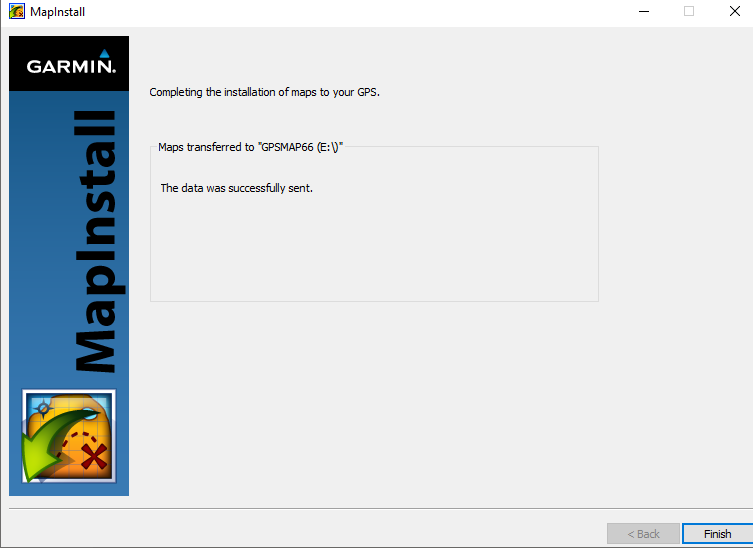
5.)Click Finish to complete the map installation.
Inside the Garmin folder on your GPS or your microSD card you will see the map data "gmapsupp.img" and your gma license file.
The .gma license file will match the version of the maps it was installed from in Garmin Basecamp.
You can check this in Garmin Basecamp under
Maps > Manage Map Products > Unlock Regions
Updating your POI data
The Digital maps can be installed to the internal memory of your GPS unit or your own microSD card.
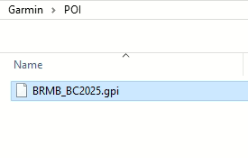
1.)If your Garmin folder does not contain a POI folder you can create one.
2.)When you downloaded the basecamp installation file it contains the updated .gpi file for your POI folder.
Copy the 2025.gpi file into the POI folder on your GPS or microSD card.
Disconnect and Reboot your GPS.
Verify that the maps are loaded by going to Setup menu and looking for BackroadMapbooks in the map list.